The largest source of trouble with marine engines these days lies with the fuel and fuel system. Paying regular attention to both can help prevent major headaches down the road. From hoses and connections to proper filtration and even fuel additives, time spent maintaining your fuel system helps keep you safe and your boat ready for action.
What is ethanol and why is it so bad for marine engines?
Ethanol has been added to the majority of today’s fuel supply as an oxygenate to help reduce emissions. It’s also used to extend domestic fuel supplies.
Ethanol is alcohol, and alcohol is “hygroscopic,” which means it attracts water molecules. Since nearly all boat fuel tanks are vented to the atmosphere, water can (and will) collect in your fuel. When the concentration of water molecules in your fuel tank reaches just 1⁄2 of 1%, the water molecules will bond with the alcohol and sink to the bottom, where your fuel pick up is. Depending on the amount of water ingested into your outboard, this can result in everything from running problems to catastrophic damage.
Ethanol, being alcohol, is also a powerful solvent that can loosen debris in your fuel tank and all the tanks and lines it was in before it got to you. Once in your outboard, this debris can cause everything from running issues to a no-start, no-run condition. That’s no fun.
What can I do to protect myself from the potentially damaging effects of ethanol?
Fortunately, there are simple procedures that can help, but it’s important that you do your part. This is one part of maintenance you must proactively do for yourself.
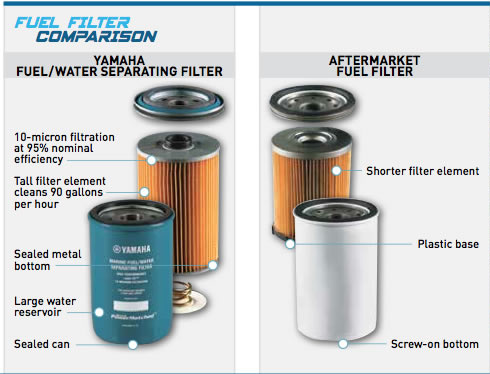
1.Install a 10-micron fuel/water separating filter in the fuel line between your fuel tank and your outboard. It filters the gas and allows any water (which is heavier than gas) to safely sink to the bottom of the filter and out of the fuel. Yamaha’s spin-on 10-micron filter traps impurities down to 10 microns in size (1/20th of the diameter of a human hair), to keep your fuel clean, and has an extra-large water-retention area. And since it’s a spin-on, it’s very easy to replace.
 Tip: Carefully filling a new replacement filter about 3⁄4 full with fresh, stabilized fuel before installation will make priming the fuel system afterward much quicker and easier.
 Tip: Apply a thin film of clean engine oil to the gasket when installing the filter. That will make it much easier to remove when it’s time.
2. Add fuel stabilizer and conditioner to every tank of fuel. Make sure to add a quality, marine-specific non-alcohol-based formula, like Yamalube® Fuel Stabilizer & Conditioner PLUS. These formulations are specifically designed to work effectively in the moisture-rich environments common to boats. And don’t believe some of the claims you see today; no matter what you add to bad gas, it’s still bad gas. No additive will restore stale fuel, remove water, or cure ethanol-related issues.
 Tip: Today’s gasoline can begin to break down in a matter of weeks, not months. Make sure to treat every tank of fuel, not just for extended storage. It’s cheap protection against a world of hurt.
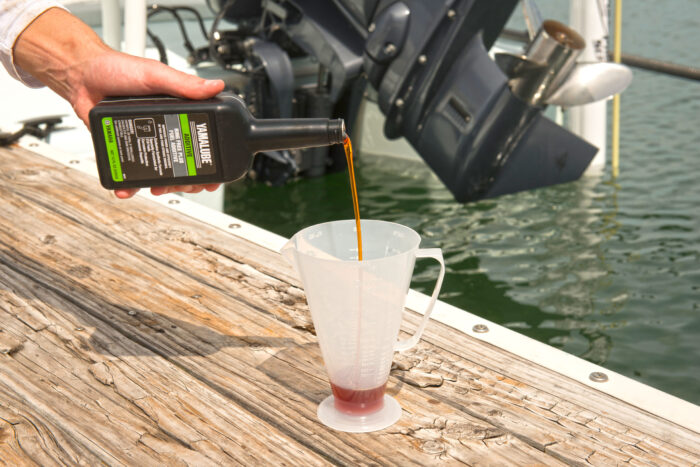
| 3. Add Ring Free PLUS internal engine cleaner to every tank of fuel. The cleansing additives in the majority of today’s gas are a great start, but they’re formulated for automobiles, so they may not work as well on your outboard. Do them one better. Ring Free PLUS makes performance-robbing carbon chemically unable to stick to internal engine components. The “PLUS” is a proprietary blend of synthetic anti-corrosion additives that helps protect the “yellow metals” in your fuel system (copper, brass and silver solder) from corrosion. These are key components to proper fuel system operation. This helps maintain their performance and reliability. Ring Free PLUS also cleans gums and deposits off of internal engine and fuel system components.
**Grab a Ratio Rite (seen in picture) for easy measuring. |
 |
4. Buy your gas where they sell a lot of it.
The goal is to keep your boat’s fuel fresh and potent at all times. Why buy gas that’s already been sitting around untreated? Buy the freshest fuel you can find, and at fill up, treat each tank with Yamalube Fuel Stabilizer & Conditioner PLUS and Ring Free PLUS. Add these before adding the fuel so they mix up well. It’s an easy, proactive and protective habit to get into.
Are there any other fuel filters, and where are they located?
Your Yamaha outboard has a system of fuel filters on the engine, as well. It’s important to know the location of these filters and to clean or replace them at the recommended intervals. You can find this information in your service manual or through your authorized Yamaha Marine dealer. As an example, here’s a general guide using a modern Yamaha fuel-injected four stroke.
1. Primary On-Engine Filter. This is typically on the front, side, or rear of the powerhead, and is usually made of plastic you can see through. It filters fuel coming into the outboard. This “primary” filter usually features a small water trap at the bottom of the cup. This is the first filter after the 10-micron filter; so if there’s water in here, it’s time to change your 10-micron. On Yamaha outboards, there may be a red ring visible inside this filter. Don’t ever remove it. If it’s floating, you’ve got water in this filter’s trap. Time for a change.
2. Vapor Separator Tank (VST) Filter. Attached to the electric fuel pump in the Vapor Separator Tank (VST), this filters gas again just before it’s pressurized into the fuel injection rail(s). The VST is a prime spot in your fuel system where deposits and gum can form, particularly if fuel is untreated, and the VST filter is the most difficult to access and usually the most expensive to replace. Help protect it by consistently treating every tank of fuel, and regularly inspecting and servicing the first two filters in the fuel line.
3. In-Line Filter. Some models have an in-line filter between the primary fuel pump and the VST (vapor separator tank) and/or in the fuel line between the VST and the fuel rail, located along the top of the outboard. Refer to your service manual or contact your dealer for the exact location for your model.
4. Fuel Injector Screen. These are built into each fuel injector. They’re very fine-mesh screens and are not user-serviceable. If debris somehow makes it here, the fuel injectors must be removed and professionally cleaned, or replaced—reason enough to inspect and/or change your fuel filters regularly.
How often should I change my fuel filters?
- 10-micron filters should be replaced every fifty hours of engine operation. Keeping this filter clean and fresh will help protect the other fuel filters on the engine and extend their service life. And always carry a spare on board, just in case you get a load of bad gas and the filter gets overwhelmed.


 Tip: Do not simply remove and dump the fuel and re-install the filter, as captured debris and water could enter the “clean” side of the filter and be released into your fuel system.
- Primary and in-line filters should be replaced after every 100 hours of engine operation. These are easy to get to and simple to replace.
- VST filters should be inspected and/or replaced after every 300 hours of engine operation, provided that the 10-micron external and initial on-engine filters have been serviced and maintained properly. Properly treated fuel will also extend the life of these filters.
What are some other tips I need to know about my fuel system?
- Check fuel system components before each trip. It’s important to visually and physically check the condition of the fuel hoses and connections for any signs of leaks or cracking each time you use your boat. Give everything the “sniff test”. You should also check your primer bulb. If the bulb does not become firm when squeezed prior to starting the engine, check for a possible fuel system leak. If none, replace the primer bulb.
- Get rid of carbon and keep it out. Yamaha Internal Engine Cleaner is a dealer-only applied product that is the strongest and most effective way to clean out carbon and other build-up from the inside of your outboard. Once done, be sure to use Ring Free PLUS regularly to help keep it that way.
- Carburetors need love, too. Late-model carburetors run very lean, with very small passages that can clog with gum and varnish. Use Yamalube® Carburetor Cleaner Dip full strength, or diluted using warm, soapy water, to help clean them up.
 Tip: Be sure to follow directions. If yours is a two-stroke carburetor, don’t immerse it in solvent for long periods of time; the special sealant used on it will be removed, resulting in damage and possible negative running issues.
- Gas containers. Be sure to add Fuel Stabilizer & Conditioner PLUS and Ring Free PLUS before filling them up, and keep them in a cool, dark place if possible. Containers available through Yamaha feature a “Spill-Proof Spout” which shuts off automatically when the container reaches capacity. This helps prevent spills and helps them comply with emissions requirements.